 15 minutes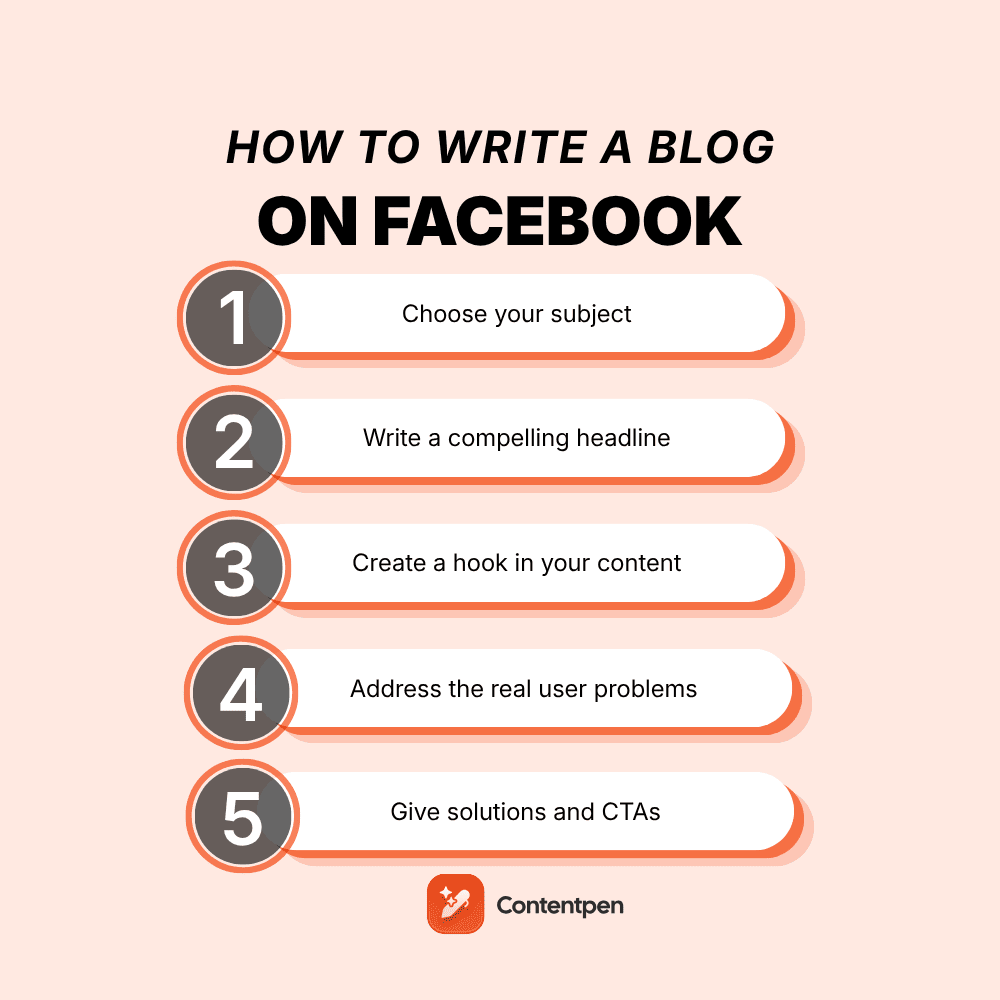
There was a time when blogging required a website domain and hosting to start. Now, all you need is your Facebook account to get started.
According to DataReportal, the USA alone had 254 million social media users in late 2025. This number indicates the massive potential for small businesses to earn online visibility and traction through Facebook and other Meta platforms.
Learning how to write a blog post on Facebook comes down to a handful of moves. You create a dedicated Page instead of using your personal profile, fill in your bio and visuals, then use the “What’s on your mind” box to write a post.
From there, you schedule future posts, add photos or videos, and reply to the people who show up in your comments.
In this guide, we’ll walk you through every one of those steps in order. We’ll also see how a tool like Contentpen can speed up the entire process for your convenience.
Table of contents
- Key takeaways
- What is blogging on Facebook?
- How do you set up a Facebook page for your blog?
- How do you write and publish your first blog post on Facebook?
- How can you write a blog on Facebook faster using Contentpen?
- What should you post, and how do you grow your Facebook blog?
- Can you make money blogging on Facebook?
- The takeaway
- Frequently asked questions
Key takeaways
- Set up a dedicated Facebook Page, not your personal profile, and choose the “Blogger” category so readers can find your content easily.
- Write posts with a clear subject, strong headline, hook, problem, and takeaway, prioritizing brevity of the copy to drive more engagement.
- Schedule posts through Meta Business Suite so your Page stays active and consistent even on days you’re not online.
- Promote new posts on Instagram, LinkedIn, Pinterest, and YouTube, then check Insights regularly to see what your audience actually responds to.
- Tools like Contentpen can draft a full blog post in minutes, which you can then trim into a shorter, punchier Facebook update and publish automatically.
What is blogging on Facebook?
Blogging on Facebook follows the same principles as blogging on a website: you choose a topic, write helpful content, and share it with your audience online. It is a good way to start expanding your social media presence without any cost.
However, you may not have the same control over your blog pages on Facebook as you’d have with your blog pages on your site.
There are limited designs you can choose from on Facebook, and the space is rented to you by Meta. Meaning, their algorithm, rules, and term changes can affect your ability to appear in front of your audience directly.
But, all things considered, starting to write blogs on a Facebook Page is not an all-out bad idea. You can write for free and even earn from your blogs later once your engagement signals grow to a significant threshold (more on this later).
How do you set up a Facebook page for your blog?

Setting up a Facebook Page means creating a dedicated business or creator Page instead of posting from your personal profile.
The reason for creating a separate Page is that Facebook Pages come with analytics and settings that a profile simply doesn’t offer. This separation keeps your blog looking professional and gives readers one clear place to follow, comment, and return to for new posts.
Facebook Page creation
Creating your Page takes only a few minutes once you know where to click.
Start by logging in or creating your Facebook account. It doesn’t matter if it’s a personal or business account.
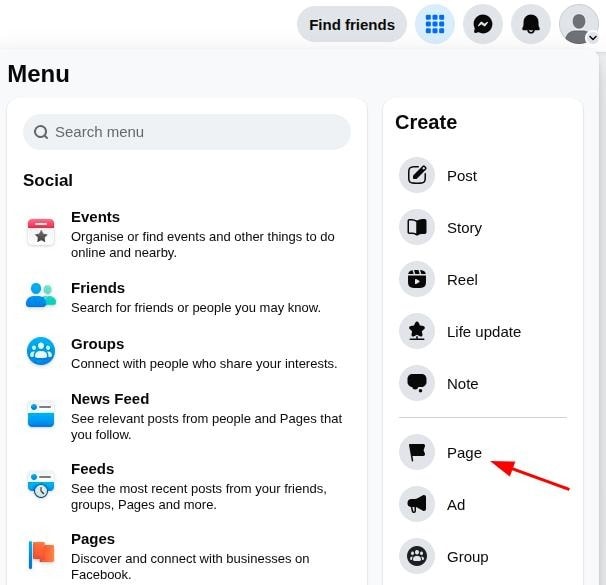
Then, click the menu icon in the upper right corner and select Page under the ‘Create’ option.
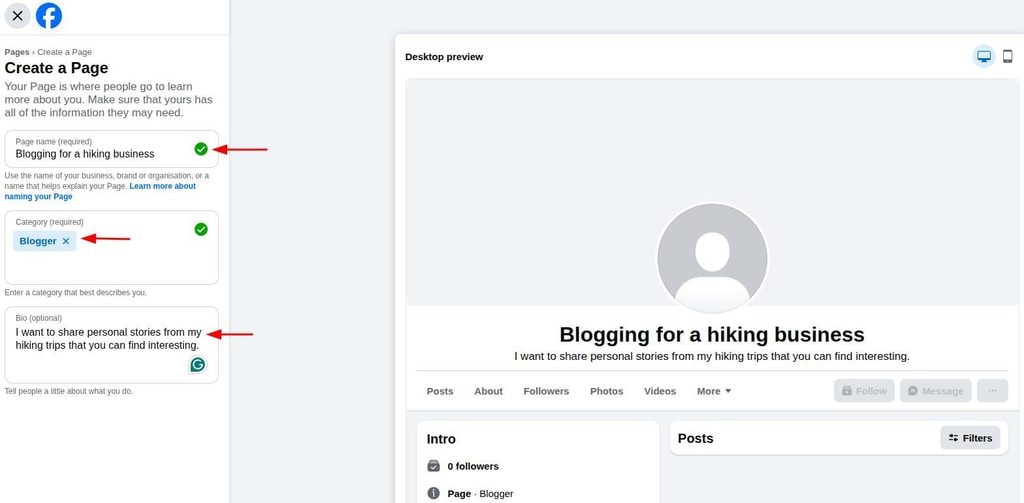
Enter your blog’s name, choose the ‘Blogger’ category so readers recognize it as a content-focused page. Then, write a short bio explaining what types of blogs or stories you’ll cover, and hit ‘Create Page’.
Customizing your Page profile and settings
Once your Page exists, add your business details, such as your website, contact number, email, and physical address, to set up the profile.
After this, give your Facebook Page a visual identity that matches your blog’s tone.
Upload a cover photo sized ideally at 820 by 360 pixels to display the image perfectly on both mobile and desktop. Then, choose a profile photo of size 320 x 320 pixels.
Please remember that choosing your profile picture is important, as this image will show up in the comments you reply to and the Facebook search results.
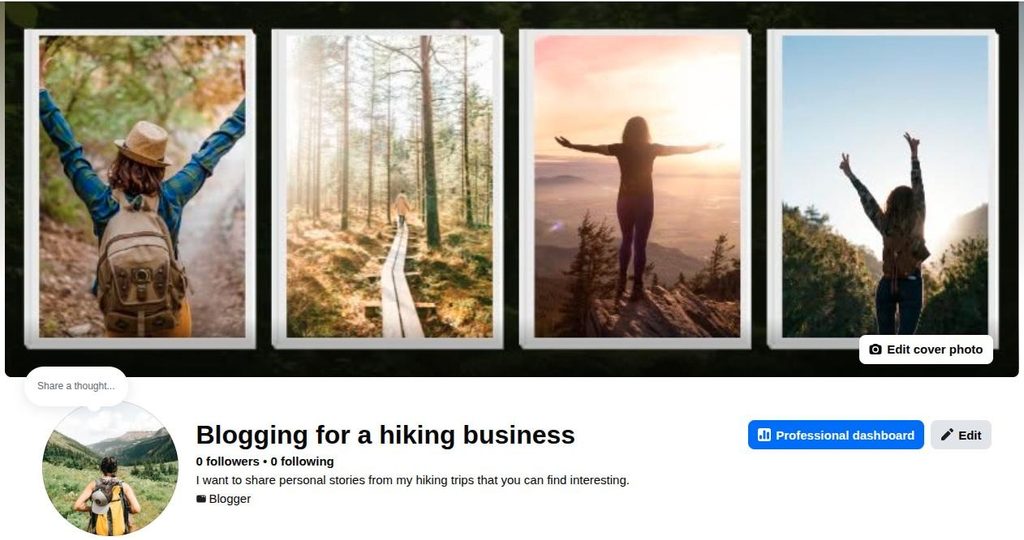
For our hiking blog example, we picked a cover photo of 820 x 304 pixels and a profile picture of size 320 x 320 pixels.
Under Page and Tagging, restrict who can post on your Page. If you want followers to comment freely but not clutter your blog feed, turn the ‘Who can post on your Page’ setting to Only Me.
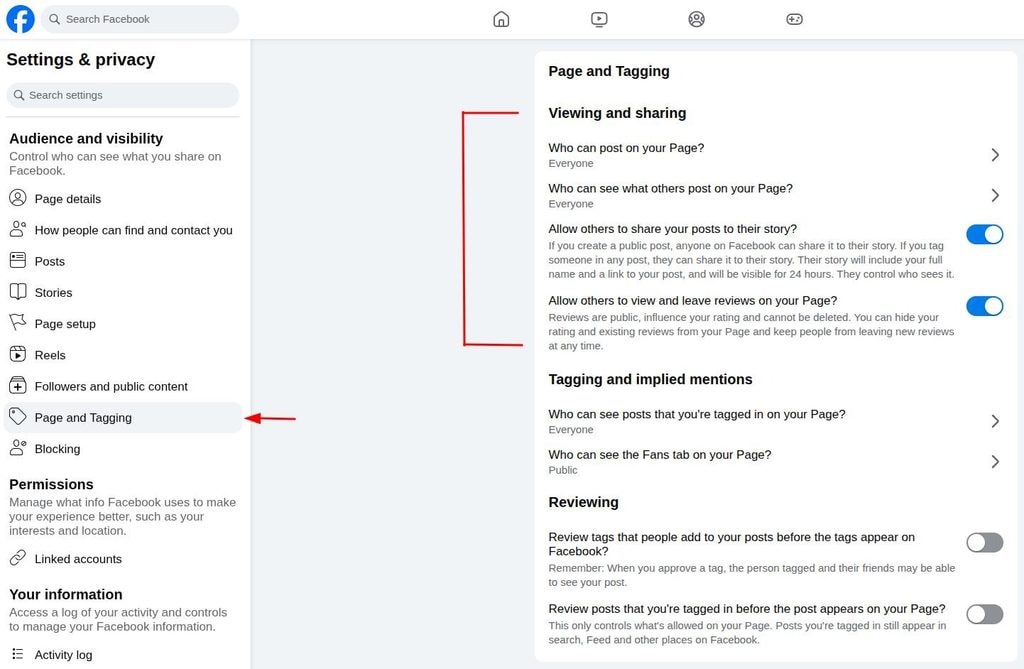
You can also turn off tags or restrict users from sharing your blogs on their feeds by turning off the ‘Allow others to share your posts on their story?’ slider.
Note: If you think you still need time before making your Facebook blog public, head to the ‘Access and Control’ settings under the ‘Your information’ tab.
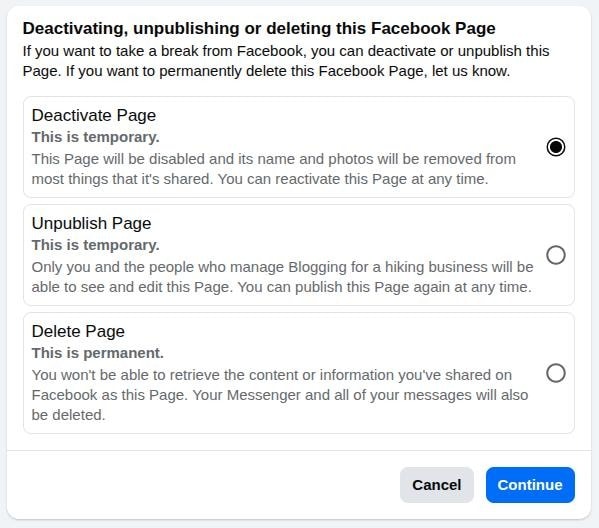
Here, you can ‘Unpublish Page’ temporarily so that only the users with admin access to your blog can access it. Once you are confident enough to go live, publish the page again using the same settings.
How do you write and publish your first blog post on Facebook?
Writing a blog post on Facebook means typing your content into the ‘What’s on your mind’ box on your Page, then shaping it into valuable content in 5-steps.

#1: Start with a clear subject
Starting with a clear subject means essentially explaining to the audience:
- What’s the content about?
- Who is it for?
- What will the audience get in return?
If you can answer these questions, you can create worthwhile content for your readers without getting stuck at any point.
For instance, the subject of our blog post on Facebook in the hiking group is “Hiking failures caused by bad preparation.”
The idea is to warn the people about what can go wrong on a hike and what they can do instead for a pleasant experience.
#2: Write a strong headline
A headline is what kicks off your blog on Facebook. It is usually a one-liner, but can be up to 2 lines long, depending on the subject.
Headlines must be highly catchy, punchy, and relatable for the audience you’re writing for.
If we continue our example of a hiking business Facebook page, a headline like ‘Why I almost threw my hiking boots away’ is perfect for a new blog post.
It is not only relatable for amateur hikers, but also for professionals who were once on the verge of giving up on a mountain (quite literally!)
#3: Craft a compelling hook
A hook is a statement, a paragraph, or a line that stops scrolls. It can be melodramatic, shocking, or an infamous hot take in the middle of the post that holds the audience and urges them to read more.
Building on our previous example, we can write something like this in our post as the hook:
“I was shivering, completely out of water, and staring down a trail sign that definitely was not there two hours ago. My brand-new boots gave me blisters by mile two. To make things worse, the easy loop my friend recommended turned out to be a steep, rocky vertical climb. Let’s be honest: hiking isn’t for everyone. At least, it is not for everyone the way most people attempt it.”
If we write something like ‘hiking isn’t for everyone,’ the statement will surely turn some heads. Later, you can elaborate on your point by giving real-life examples, Do’s and don’ts, or experiences from your life.
#4: Talk about the real problem
So far in your post, you’ve contained the reader with your headline and hooked them into reading more. Now, get to the main problems or pain points of the post.
If we’re on to the subject of hiking failures, let the readers know that most people fail because:
- “❌ They trust unreliable phone apps for navigation.
- ❌ They wear gear that is not suitable for the weather.
- ❌ They underestimate how much water and fuel their body actually needs.”
Once you put a finger on the problems, start putting solutions to them.
#5: Provide solutions and CTAs (takeaways)
Finally, look to solve the problems and pain points your audience goes through. Give them clear takeaways and next action steps so they are not stuck pondering over the solution themselves.
For instance, we can highlight the following solutions to the problems we highlighted earlier:
- “Always download offline maps before you leave because cell service drops fast.
- Pack 250 calories for every single hour you plan to be on the trail.
- Layer up with wool or synthetics. Avoid cotton because it holds sweat and freezes you.”
Since we created the Facebook Page for an imaginary hiking business, we need to leave the audience with a fitting CTA as well.
Example:
“Want to skip the struggle and actually enjoy the views? We are hosting a Live Trail-Readiness Workshop this Saturday at [XYZ Company].
We will help you prep your pack, map your routes for the [X] trail, and ensure your next hike is memorable for the right reasons.
👉 Click the link in our comments to grab a free spot!”
The finalized post will look like this:
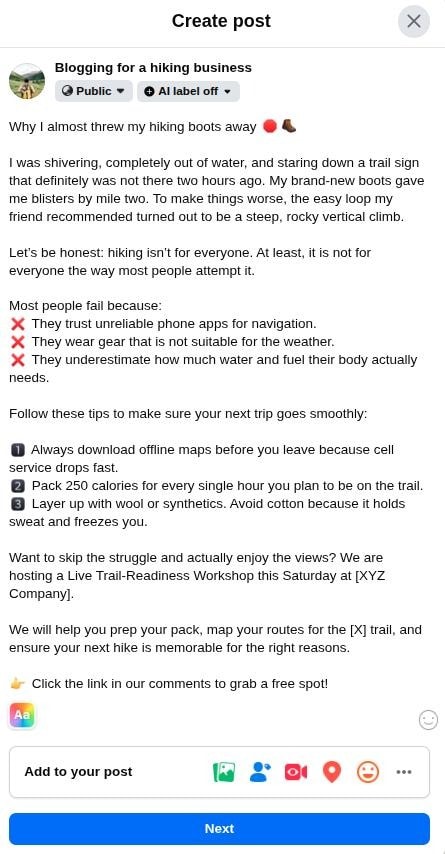
And voila! This is how you’ll properly close your Facebook blog post without sounding too salesy and by providing helpful content to the audience.
Publishing your post step by step
To publish, paste in content you drafted elsewhere, since Facebook’s text box offers little editing power and many writers prefer drafting first in Google Docs or Microsoft Word.
For short posts (under 80 characters), try the colored background option and add emojis through the smiley icon to give the copy some personality. Add relevant hashtags to help readers discover your post through Facebook’s search and topic feeds.
Then, click the three-dot menu next to the Add to your post option to unlock more features. These include photo or video uploads, GIFs, Go Live, Get WhatsApp messages, Raise money, and Get calls options, acting as built-in CTAs for the post.
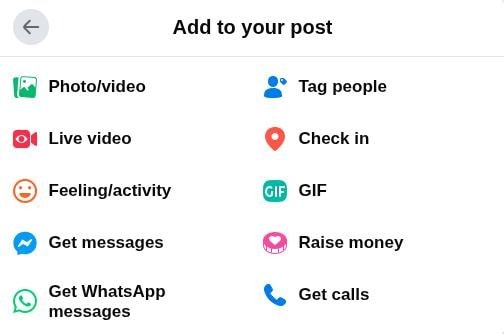
Note: Adding visuals to your post significantly increases scroll-stop potential and boosts engagement. Use them whenever possible for maximum results.
After finalizing your text and media, click Post, and your content is published immediately to your Page and into your followers’ feeds.
How can you write a blog on Facebook faster using Contentpen?

Writing a blog on Facebook gets a lot faster when an AI writing tool like Contentpen handles the first draft. It moves you from research and planning through drafting, optimizing, refining, and finally publishing or scheduling the post within minutes.
Because the platform pulls from a saved brand knowledge base, a full blog draft and a shorter Facebook adaptation of that same post both sound consistently like your brand.
The on-brand image generation produces visuals that match your style, covering the visual side that drives so much engagement on Facebook.
Finally, the tool’s ContentStudio integration lets you adapt finished blog content and schedule the post for Facebook from a single dashboard.
Some teams that switch to this kind of workflow report cutting a full day of writing and publishing content down to under an hour, with steadier organic traffic rolling into their platforms.
Check out Contentpen testimonials from tech, real estate, travel, and other industries. See how it helps achieve a much faster writing workflow with less effort.

Write content that’s built to rank, not just read
Create search-optimized blogs aligned with SEO and GEO signals, so your content performs well across search and AI-driven discovery.
Try SEO Blogging FREE →
What should you post, and how do you grow your Facebook blog?
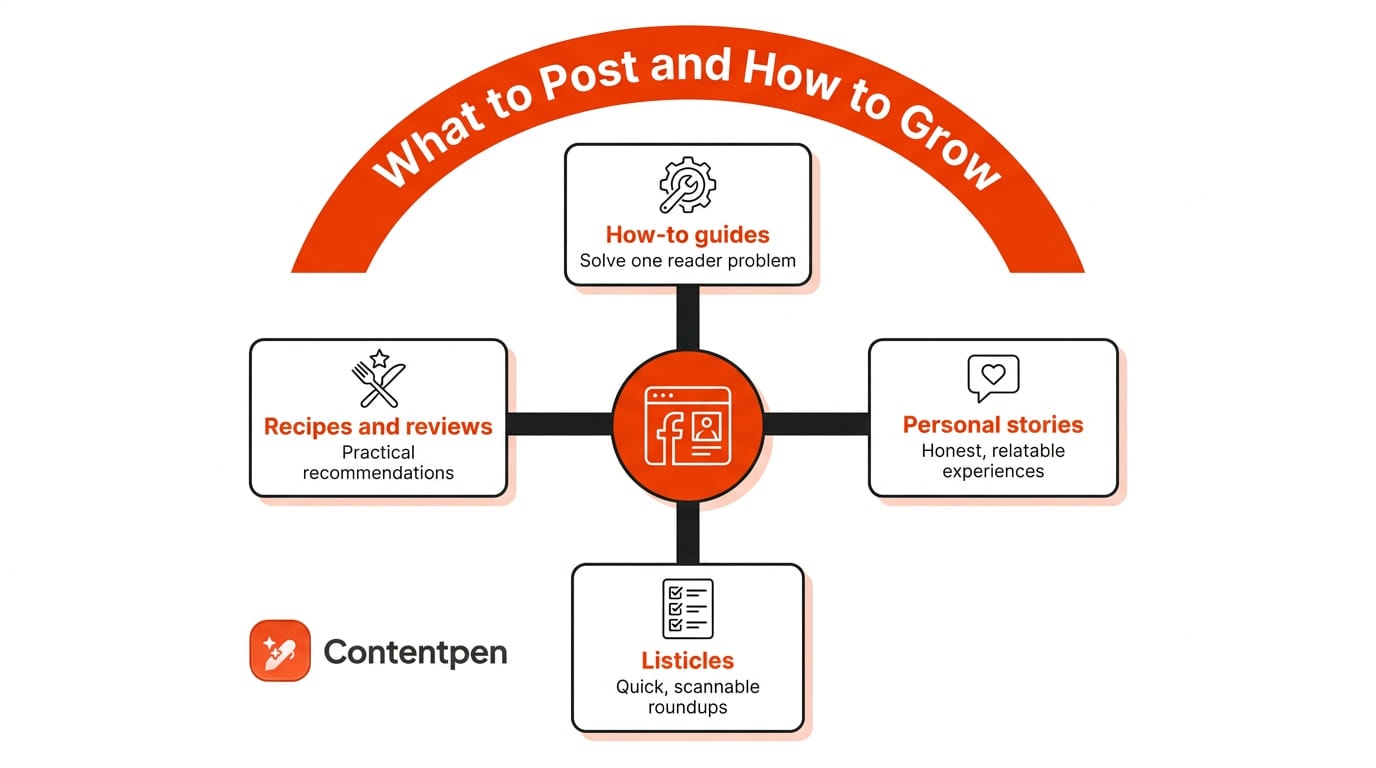
Choosing what to post starts with picking one niche you can stick with, since a blog that jumps between topics confuses readers and stalls growth over time.
High-performing categories on Facebook include how-to guides, personal stories, listicles, recipes, and product reviews.
- How-to guides and tutorials that solve one specific reader problem.
- Personal stories and relatable, honest experiences.
- Listicles and quick, scannable roundups.
- Recipes, product reviews, and practical recommendations.
That said, the topics that work best ultimately depend on your specific audience and what Meta Insights shows you week to week.
Once you know what to post, schedule it through Meta Business Suite by creating a post, adding photos or videos, setting a date and time, adjusting privacy, and then clicking Schedule.
Then, cross-promote new posts on Instagram, LinkedIn, Pinterest, and YouTube to reach readers who don’t already follow your Page. Check Insights often and put more effort into whatever format keeps people engaged.
Can you make money blogging on Facebook?

Yes, you can make money blogging on Facebook, though income depends on building an engaged audience first rather than posting alone.
Once your Page qualifies for Facebook’s monetization tools, a few options open up.
| Option | What it offers |
| Stars | It lets fans send small paid tips during posts or live videos |
| Sponsored content | Brand partnerships, once you have an audience worth paying for |
| Facebook Shops | Sell products directly through your Page storefront |
| Affiliate marketing | Earn a commission by linking to products from other brands in your posts |
The threshold to start earning on Facebook varies on the monetization option. For instance, you can get Stars by retaining at least 500 followers for 30 consecutive days.
The payouts generally depend on your geographical location, niche, and type of blog.
Note: You must reach at least $100 in earnings before getting a payout from Facebook.
None of these options pay meaningfully without consistent posting and real engagement. Combining 2-3 of these income streams tends to work better than relying on just one.
Most bloggers who do earn from Facebook also cross-promote rather than relying on just one channel.
The takeaway
Writing a blog on Facebook really comes down to four moves you repeat consistently: setting up a proper Page, writing posts with the five-element formula, scheduling content through Meta Business Suite, and promoting what you publish on other social channels.
None of it requires expensive tools or a website, just a Page, a clear niche, and a habit of showing up consistently.
If writing day after day feels like the hardest part, a tool like Contentpen can draft a full post in minutes so you spend your time editing and posting instead of staring at a blank screen. Open a Facebook Page today, write your first post, and publish with Contentpen now.